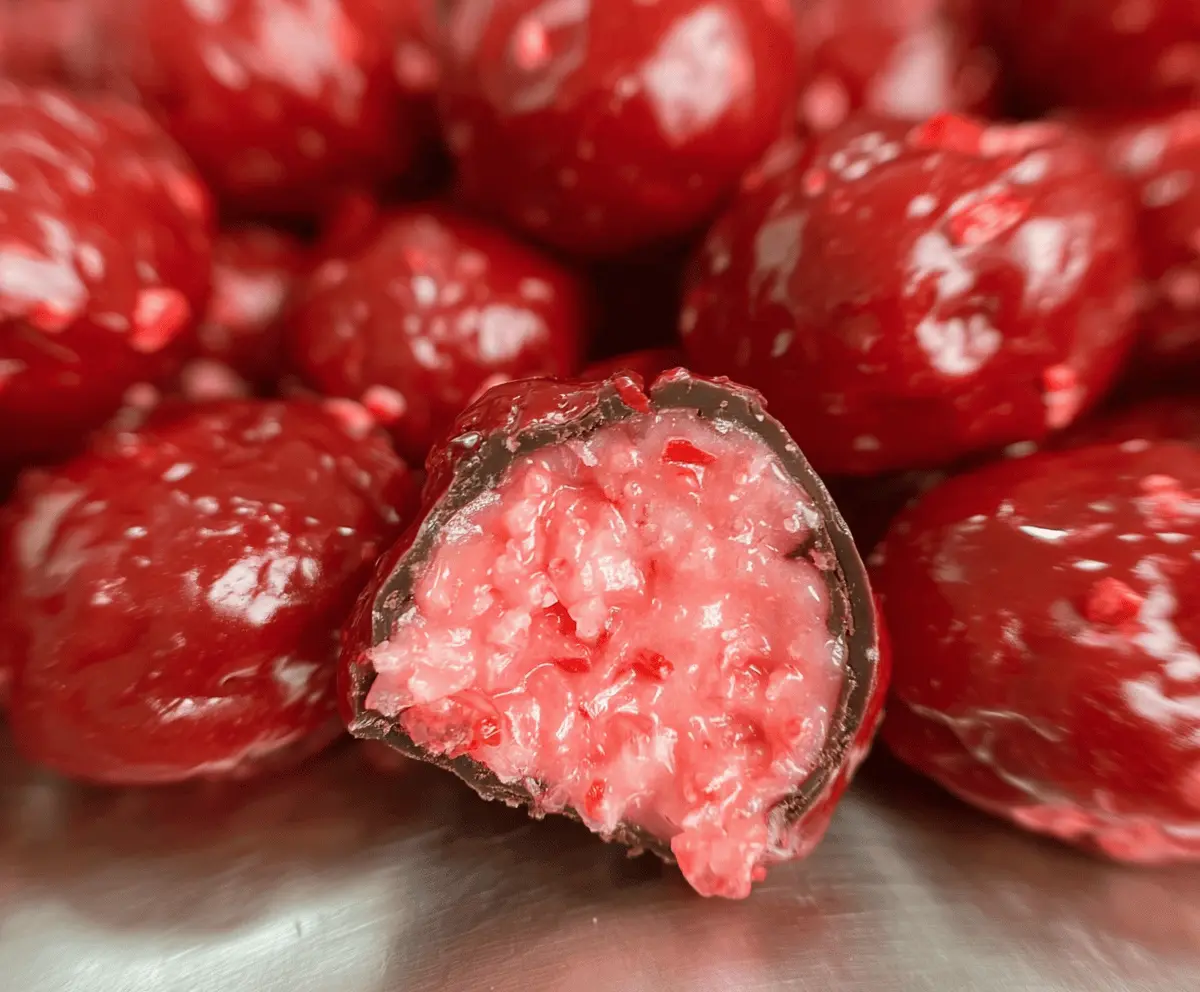
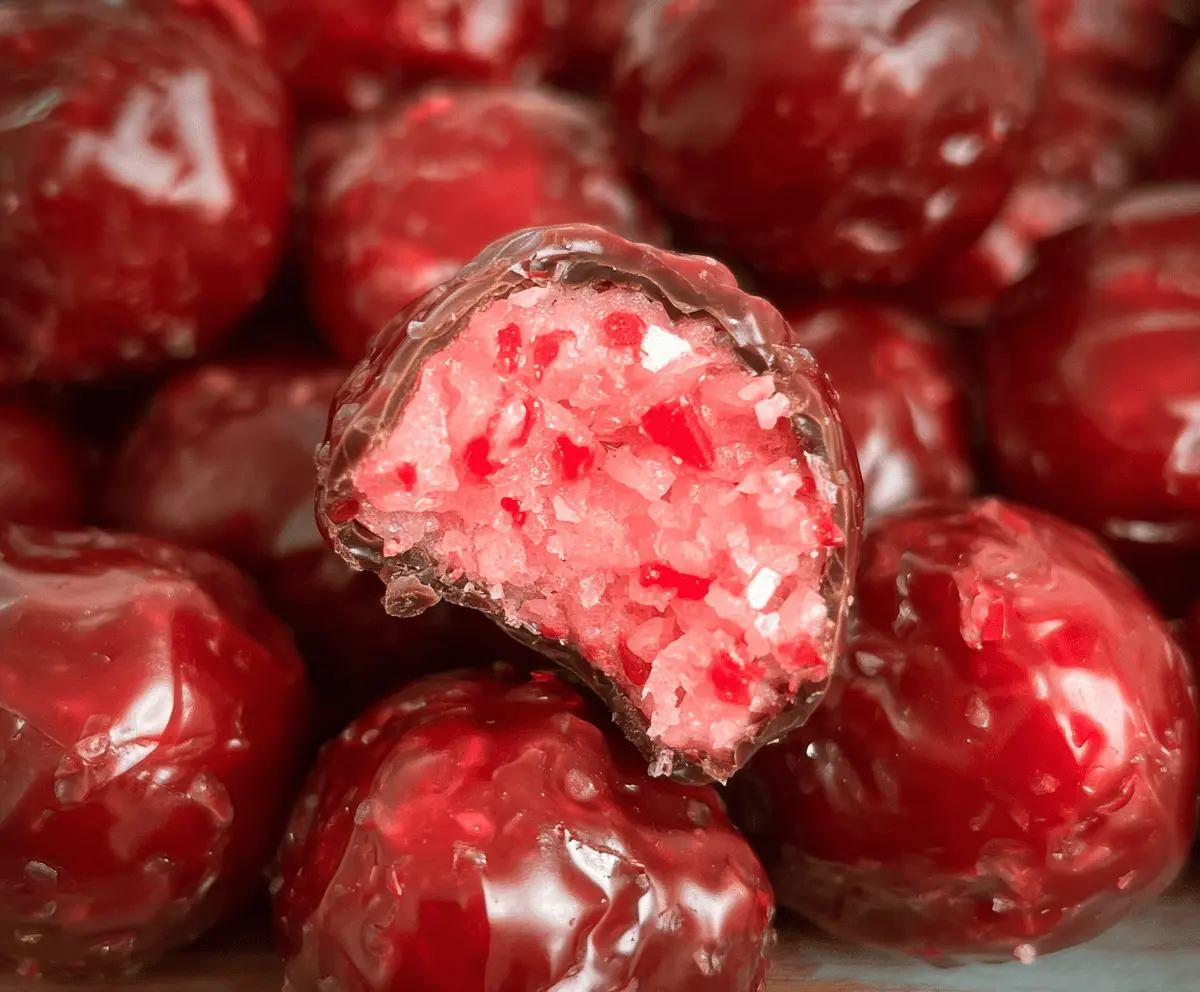
This Easy Homemade Cherry Mash Candy is a fun and sweet treat! It mixes yummy cherry flavor with creamy chocolate, making every bite a delightful surprise.
I love whipping this up when I want something special but simple. Just melt, mix, and mold! You’ll have a crowd-pleasing candy in no time. Yum! 🍒🍫
Key Ingredients & Substitutions
Semisweet Chocolate Chips: These are perfect for coating your candy. If you’re looking for a different taste, dark chocolate or milk chocolate chips can also work well. I often use a mix for added depth!
Chopped Nuts: Pecans or walnuts add crunch and flavor. If you have allergies or want a nut-free version, you can skip them or use crushed graham crackers instead for texture.
Maraschino Cherries: Look for quality cherries that are firm and sweet. If you prefer a more natural flavor, you could use fresh cherries, but remember to pit and chop them small. It changes the taste but still delicious!
Marshmallow Creme: This gives the candy a fluffy texture. If unavailable, try replacing it with an equal amount of whipped cream or whipped topping for a lighter take.
Cream Cheese: For that creamy base, softened cream cheese is essential. If you’re going dairy-free, consider a vegan cream cheese alternative that mixes well.
How Do You Get the Right Chocolate Coating?
Coating your cherry balls in chocolate might seem tricky, but it can be simple with a few tips. Start by melting the chocolate carefully; don’t rush it as it can burn quickly.
- Use a microwave in short bursts or a double boiler to melt the chocolate. Stir well between melts until smooth.
- For a thicker coating, letting the melted chocolate cool slightly can help it stick better to your cherry balls.
- Dip with a fork or dipping tool, letting the excess chocolate drip off before placing it back on parchment paper.
Chilling the cherry balls before dipping makes them firmer, which can help keep their shape during coating. Enjoy your delicious treat!
Easy Homemade Cherry Mash Candy
Ingredients You’ll Need:
- 2 cups semisweet chocolate chips
- 1 cup chopped pecans or walnuts
- 1 (7 oz) jar maraschino cherries, drained and chopped
- 1 (16 oz) container marshmallow creme (fluff)
- 6 oz cream cheese, softened
- 1 1/2 cups powdered sugar
- 1 teaspoon vanilla extract
- Optional: 1 tablespoon corn syrup (for added smoothness in chocolate coating)
How Much Time Will You Need?
This delicious treat takes about 10 minutes of active preparation time. You will also need around 1 hour for chilling the mixture and another 30 minutes to set the chocolate. So, in total, you’re looking at about 2 hours and 10 minutes before you can enjoy these sweet bites!
Step-by-Step Instructions:
1. Mix the Base:
In a large bowl, use a hand mixer or your trusty spatula to combine the softened cream cheese and marshmallow creme until everything is nice and smooth. This will be the creamy base of your cherry mash candy.
2. Add Flavor and Sweetness:
Next, sprinkle in the powdered sugar and pour in the vanilla extract. Continue mixing until the mixture is fully incorporated and all the sugar is dissolved. Your cream should feel light and fluffy!
3. Fold in the Cherries:
Gently fold in the chopped maraschino cherries. Be careful not to overmix; you want to keep the cherries intact for a burst of flavor in every bite!
4. Chill the Mixture:
Cover the bowl with plastic wrap or a lid and pop it in the refrigerator for about 1 hour. This helps the mixture firm up, making it easier to shape into balls.
5. Melt the Chocolate:
While your mixture is chilling, melt the semisweet chocolate chips along with the optional corn syrup in a microwave-safe bowl. Stir every 30 seconds until smooth, or use a double boiler if you prefer. The corn syrup makes for a lovely glossy finish.
6. Add Nuts to the Chocolate:
Once your chocolate is nice and melted, stir in the chopped nuts. This adds a delightful crunch to your candy coating!
7. Shape the Cherry Balls:
Once the cherry mixture is chilled, scoop out tablespoon-sized portions. Roll them into nice little balls and place them on a parchment-lined baking sheet. Let them chill for an extra 10 minutes.
8. Dip and Coat:
Now, it’s time for the fun part! Using a fork, dip each cherry ball into the chocolate-nut mixture, making sure it’s thoroughly coated. Allow the excess chocolate to drip off before placing them back on the parchment paper.
9. Let Them Set:
Refrigerate the dipped candies for about 30 minutes until the chocolate hardens completely. You’ll love that snap as you bite into them!
10. Enjoy Your Creation:
Store your finished cherry mash candies in an airtight container in the fridge until you’re ready to share (or keep them all for yourself)! Enjoy the sweet, creamy, and nutty flavors of this classic treat!
This easy homemade Cherry Mash Candy is a delightful treat perfect for sharing with family and friends or simply indulging in for yourself. Happy candy-making!
FAQ for Easy Homemade Cherry Mash Candy
Can I Use Different Nuts in This Recipe?
Absolutely! While pecans and walnuts are the traditional choices, you can use any nut you prefer, such as almonds or hazelnuts. For a nut-free version, consider using crushed graham crackers for added texture!
How Do I Store Leftover Cherry Mash Candies?
Store any leftover candies in an airtight container in the refrigerator to keep them fresh. They should last up to one week, but I doubt they’ll last that long—they’re too delicious!
Can I Make This Recipe Vegan?
Yes, you can! Substitute the cream cheese with a dairy-free cream cheese alternative and use vegan marshmallow fluff. Ensure your chocolate chips are dairy-free as well to accommodate a vegan lifestyle.
What’s the Best Way to Melt Chocolate for Coating?
The safest way to melt chocolate is either in the microwave in short bursts (stirring between each) or over a double boiler on the stove. Be patient to avoid burning! Using a tablespoon of corn syrup in the chocolate can help achieve a smoother finish.